Tuesday, December 21, 2010

Vegetable Garden, Part 3: Successes & Failures

The weather's been dryer, and I'm having to water the garden a couple of times a week. We're getting winds with gusts up to 28 miles per hour (less than average for December), combined with spray precipitation. From my bed at night I can hear water trickling in the downspout. This sometimes goes on all night. But in the morning when I check the rain gauge it is usually only damp at the bottom. Sometimes it may show a 10th of an inch or so. This is good for shallow-rooted crops, such as grass, carrots, and vegetable greens, but is not good for deeper-rooted plants like tomatoes, corn, shrubs, and trees.

Last week I transplanted 30 asparagus seedlings into a raised bed. The plants are about four inches tall and resemble little pine trees. I ended up with some extra seedlings, which I'm keeping in the flat just in case any of the transplants don't make it.

Onions, beets, cabbage, broccoli, and lettuce seedlings have also been planted in the garden. Mustard greens are looking good and are almost ready to harvest. We're harvesting radishes and cilantro every several days. In South Carolina I had trouble getting my radishes to form bulbs. I was never sure why. Here, that problem doesn't seem to exist. They're a winner.

Sweet potatoe and squash plants are spreading. Peanut plants are about six weeks old and looking good. Carrots have been thinned, but seem to be growing very slowly.

We finished harvesting the last batch of lettuce, which was a tremendous success. Lettuce heads were given away to neighbors and visitors. The lettuce doesn't seem to bolt here like back in South Carolina, and can be grown year round -- another winner.

Corn, 3rd planting (silver queen) -- Three weeks ago they were beginning to tassel. The plants looked good and were a deep, dark green color. But I noticed they were only about four feet tall, about a foot or two less than normal for this variety. Abruptly the leaves began to turn brown and dry. They are putting out very small ears. Corn is a heavy feeder. I had given them a side dressing of fertilizer. Lesson -- until I can build up more organic nutrients, I'm going to have to use more chemical fertilizer.

Nutrient deficient corn plants

Corn, 4th planting (silver king) -- Had about 60% corn stalk borer infestation; have now been treated with insecticides. The plants are about eight inches high; I gave them a side dressing of fertilizer yesterday.

Sweet peppers -- several plants have died. I think it's been a little too wet for them. The remaining plants are looking okay.

The Irish potatoes were wiped out by some kind of soil disease. They were planted during a rainy spell, in raised beds. I suspect fungus or bacterium, or both. I purchased them in the supermarket, which, in my experience, is usually a mistake. I posted a message on Costa Rica gardening about them. According to one of the responses, potatoes used to be easy to grow in Costa Rica, but now there are nematodes, bacteria, and fungi, and they are marginal at best for the home gardener. One woman said she can buy Yukon golds at the feria (farmer's market) in Grecia. I hope to go there one day with her to get some good seed stock.

Jalapeña peppers -- Bought 2 more plants at EPA. They're beginning to show signs of nitrogen deficiency. I just gave them some fertlizer.

Tomatoes -- All 4 plants are looking healthy and are covered with blossoms. Two of them have been moved out to the garden. I covered the soil around them with black plastic in order to prevent soil-born diseases. I'm worried about the spray precipitation, but it has slacked off in the last few days. The other 2 I'm keeping on the balcony (out of the rain) for a while as a precautionary measure. However, they are beginning to get too big for the pots.

Happy gardening!

Friday, December 17, 2010

The Pond, Part 1

I'd really like to call this our water garden, because that's what it is. A pond with plants and fish in it is an extension of the land garden, just as beautiful, and as enjoyable. But water garden is a bit long and pretentious sounding, so, for the sake of brevity, I'll just call it a pond.

When I was a teenager, living in Alexandria, Virginia, we had a small pond in the middle of our brick patio. It started out with goldfish, and then we added water lilies and water hyacinth, and it became something extra special. A couple of times we drove out to Adamstown, Maryland, to visit the Lily Pons Water Gardens to buy fish and plants ( http://www.lilypons.com/contactus.asp ). We didn't realize it at the time, but Lily Pons is one of the premier pond supply companies in the world. It was a really neat place to visit. Dad loved the goldfish, and learned that he could fatten them up with houseflies. One summer he had a hernia operation and was laid up at home with nothing to do for a month. That's when he got out the flyswatter, swatted and fed the flies to the fish, and tried to see how much he could get those goldfish to grow in one month. He got so into it that he began putting out sugar to attract the flies. He had a clipboard with a tally sheet where he made a hash mark for each fly killed. I think his record for flies killed in a day was over 80. So, here was this high-powered Washington lawyer spending his summer killing flies and feeding them to the goldfish. Go figure.

Many years later when we lived in Clemson, South Carolina, Maria and I installed one of those rigid plastic ponds that we purchased at Lowe's. It held about 150 gallons and was about eight by four feet in size. We quickly fell in love with it, and our only regret was that we didn't get a bigger one.

So when we retired to Costa Rica one of the of the first things we decided to do was to build a much larger pond. It's 30 feet long by 15 wide. It's size and location came about, in part, by accident. Our lot is on an incline, and even before the house was finished we had problems with rainwater runoff. The municipality required us to channel our downspouts into an underground cavern filled with boulders. This has worked pretty well. But until we had trees, shrubs, and grass, there was a lot of runoff from the dirt around the house, and also, we built a large driveway, which channeled water to the lower part of our lot, and then down onto two neighboring lots. Whenever we got a big downpour, it looked like a river running down past our house. So, we hired a backhoe guy to make a rainwater catchment basin as a temporary measure. The basin became an eyesore, and one day when we were talking about how we could change it, it dawned on us that this would be the perfect place for our pond.


Rainwater catchment basin during a heavy downpour.
We also decided to harvest rainwater from our roof and driveway, channeling the water either directly to the pond, or to an underground storage tank, which would serve as a reserve to refill the pond between rains and during the 5-month-long dry season. We went with a 1,100-gallon tank. For the installation of the tank, see the blog entry for November 27, 2010.

We had heard that there was a professional pond builder in Costa Rica, but after some discussion Maria and I decided to hire a local, Alexis Sanchez, to do the job. Alexis has extensive experience as a builder, is a jack of all trades, and has built a couple of small ponds with fountains. Also, he had already built two fences for us and we knew he was a hard worker, honest, conscientious, and reasonably priced. Alexis first built our water harvesting system. After that he built a temporary fence dividing our property in two, so our dogs wouldn't get into the pond. Also, he rewelded my 34-year-old wheelbarrow, fixed our electric gate, installed a door lock in the house, and then went on to build a patio at one end of the pond, a seven-foot high wall (as a windbreak), and a small structure to house our electric water pump. The whole process took six weeks, but he really did a lot of things other than the pond.

Alexis and helper transforming the rainwater catchment basin
Alexis, my wife, and I all agreed that we wanted a plastic liner anchored around the edges with cement and river-stone, we wanted a two-level pond, the shallow end being at least a foot deep, and the deep end between two and three feet deep, and we wanted a small waterfall. We also agreed, after some discussion, that it should not have a drain pipe at the bottom, but would have an overflow pipe at the top. In the event we ever wanted to drain the pond, we would have to use a pump.

It took Alexis and two helpers three days to modify the original rainwater catchment basin into the approximate dimensions we wanted. Next Alexis went to San Jose to buy the liner, which I had told him had to be at least 30 mil thick. He returned with a roll of polymer which was only 8 mil thick, saying that this was the thickest plastic available in Costa Rica. I was disappointed, but we agreed to put several layers down on top of each other. When we spread it out, we discovered that it was more than long enough, but was not quite wide enough to do the job. This resulted in further discussion, and an eventual plea for advice with the Yahoo ponders group ( http://groups.yahoo.com/group/PONDERS_INTERNATIONAL/ ). I quickly received an email from a professional pond builder back in the States warning me that overlapping liners (in order to fit our width) would be a critical mistake. He also strongly encouraged me to purchase EPDM liner 45 mils thick. Further discussion followed, and we finally agreed to make the pond about four inches shallower, which would bring the width in enough that we wouldn't have to use overlapping liners.

Covering the dirt with sand to protect the liner
As for using EPDM, this would have resulted in halting the construction for at least a month while we waited for the EPDM to be imported from the States. Maria said she'd go nuts if she had to look at that muddy hole in the ground for another month, so that settled that -- we went ahead with what we had. All this explanation may sound too detailed to some of you, but believe me, this is the short version.

Anchoring the liner with cement and river stone
One of the last things Alexis did was to build the waterfall. As you can see from the picture, it is shale, placed horizontally with cement. It has a horizontal two-inch pipe hidden at the top with a row of holes drilled in it, to give the cascade adequate width.

Maria & her sister admiring the pond (windbreak at left, housing for pump at lower right)
The pond is now finished, except for some landscaping around the outside of the cement and river stone. But in another week or two, we will hopefully have this finished.

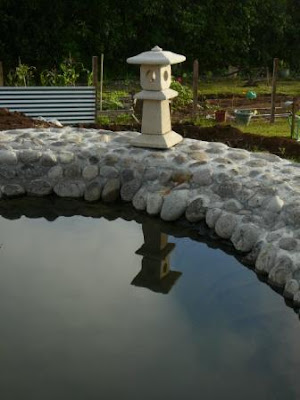
Pagoda
We got our fish and snails at local aquarium stores. We have small-to-medium-sized kois of all colors that have grown by leaps and bounds in the three short weeks they have been in the pond. We also have several kinds of small goldfish, and also several swordtails. The smallest goldfish and the swordtails hang out in the shallow end; the kois in the deep end.

Getting plants was quite an adventure. Water hyacinth were the easiest -- we got them at a local nursery. We bought watercress at the local supermarket and rooted it in some damp soil. We went to a couple of places where we were told we could get "lirios de agua (water lilies)," but each time we discovered they were only water hyacinth. We have some kind of small plant we got from a stream. Not sure what it is. Water lettuce and duckweed we got from Barry Biesanz in Escazu ( Biesanz Woodworks -- http://www.biesanz.com/ ). For our one water lily we had to drive all the way to Alto la Palma, which is halfway between Puriscal and Parrita (on the Pacific coast). The water lily, along with some duckweed and water pickerel, was given to us by Mariel Castanada. She and her husband Brian took us on a tour of their beautiful resort/housing development ( http://www.altigua.com/ ). If anyone is considering moving to Costa Rica, their development is definitely worth checking out. We were able to make contact with both Barry and Mariel through the Yahoo Costa Rican Gardening group ( http://groups.yahoo.com/group/crgardening/ ).

Waterfall (on island in foreground is statue of monkey contemplating a human skull)
Our frogs we caught with a net at a local pond. We're not sure what kind they are. We got six, and two of them died. One of the survivors is serenading us in the evenings. All of the fish and snails seem to be healthy. The sides and bottom of the pond are covered in algae, but the water is very clear.

And . . . we just LOOOOOVE our pond!!!

Happy gardening!

Thursday, December 2, 2010

Vegetable Garden, Part 2

4-week-old asparagus seedlings planted in flat
The vegetable garden is showing great promise. We have already harvested a few ears of corn, mustard greens, jalapeña peppers, peanuts, and lettuce, and have gone through several crops of cilantro and radishes. We now have 6 raised beds, and 2 more on the way. We have cabbage and purple and yellow onion seedlings in the garden, about ready for transplanting. In flats we have lettuce, beets, broccoli, white onions, and asparagus.

Tomato plants in the windowsill of our balcony, avoiding the heavy rains. Note: 2nd plant from the left had an infestation of green aphids and leaf mites, which were removed by hand.
Here's a rundown of whats happening . . .

ASPARAGUS
Got about 60% germination in flats. Should be ready to go into permanent beds in a couple of weeks.

BEETS
In flats, to be transplanted soon.

BROCCOLI
In flats, to be transplanted soon.

BUSH BEANS
To be planted in dry season.

CABBAGE
In flats, to be transplanted soon.

CARROTS
Have sprouted and are in need of thining.

CAULIFLOWER
To be planted in dry season.

CILANTRO
Have gone through several harvests and have more on the way.

CORN
1st planting - (silver king) wiped out by grubs & wet, clay soil.
2nd planting - (silver king) treated for grubs and stalk borers (100% infestation); heavy rains during tasseling period reduced ear size and rotted some of the corn.
3rd planting - (silver queen) Treated for stalk borers (near 100% infestation); plants looking excellent now; beginning to tassel.
4th planting - (silver king) about 4 inches high (some signs of stalk borer infestation)

CUCUMBERS
1st planting - wiped out by wet weather.
2nd planting - waiting for dry season to plant.

LETTUCE
1st planting - harvest was mediocre.
2nd planting - harvesting a bumper crop.

MUSTARD GREENS
1st planting - big success
2nd planting - a couple of inches high.

OKRA
1st planting - pooped out.
2nd planting - plants have good color, but are very small and spindly. A mystery. The question now is, should we try a third time with a different variety, or call it quits.

ONIONS
White - in flat, soon to be transplanted.
Purple - in the garden, soon to be transplanted.
Yellow - in the garden, soon to be transplanted.

PEANUTS
1st planting - mediocre harvest, but a miracle given the awful weather and soil.
2nd planting - has sprouted and is looking good.

PEPPERS
jalapeña - bought 6 plants at EPA, which produced a bumper crop until torrential rains arrived and wiped them out. 2 more plants purchased at EPA are looking good and beginning to produce.
Sweet - Not sure what variety they are; doing fairly well despite heavy rains.

POTATOES
Potatoes purchased at farmers market in San Isidro de Heredia; beginning to poke up through the soil.

RADISHES
Harvested several crops of different varieties. If only other vegetables were this easy to grow.

SQUASH
Planted a native heirloom variety which are leafing out and hopefully will begin to produce vines soon.

SWEET POTATOES
Beginning to vine. Variety unknown.

TOMATOES
1st planting of 4 plants - lost to heavy rains and high humidity.
2nd planting of 4 plants - planted in garden, then dug up and moved to pots on balcony due to very wet weather. Looking very good at this time. One variety is heirloom Cherokee purple (I want to make sure a can harvest some seeds).

WATERMELON
To be planted in dry season.

Happy gardening!

Wednesday, December 1, 2010

November Weather Report -- Fair Weather Continues

We experienced three weather patterns during November. At the outset west winds brought rain and fog, dumping seven inches of rain during the first five days. Then the winds shifted around to the northeast, bringing mostly sunny weather with periods of calm alternating with light breezes. The month finished with stronger northeast winds, with alternating periods of sun, and light showers. The showers sometimes lasted most of the day, but were hardly measurable on the rain gauge. This last period was more like typical December weather hereabouts: gusty northeast trade winds with light to very light (spray) showers, with the sun shinning the whole time. Rainbows are common, as are beautiful sunsets. The Ticos call these moderate showers with gusty winds, "garubas del Niño" (rains from the Christ child) in anticipation of the Christmas season. Lighter showers with stronger, gusty winds (what I call spray precipitation) are called pelo del gato (cat hair), a very apt term. Total rainfall for the month was 9.8 inches.The high temperature was 78.

Tithonia diversifolia
Our good friend Louis Bregger arrived from the States on November 21, bringing with him an anemometer (wind gauge) that I'd ordered over the internet. The highest wind speed I've recorded so far is 18 mph. Last December and January were extremely windy here, which prompted me to purchase the anemometer, so that we could see exactly how strong the winds blow. So far, it seems less windy this year.

Yours truly standing next to our Dahlia imperialis.

I've included photos of two wild flowers that bloom here this time of year: Tithonia diversifolia (tree marigold or Bolivian sunflower) and Dahlia imperialis (tree dahlia). They're both in the aster family and are native species. They grow wild along the roadsides, but are occasionally grown by homewners as ornamentals. The tithonia can grow to over 12 feet tall and the dahlia to as much as 10 feet. Some of the dahlia flowers are doubles, others singles. We've become interested in the small, black stingless bees (called "congas" by the Ticos) who like to eat the sap of the dahlia, chewing at the leaves or at the leaf stems.

Happy gardening!

Saturday, November 27, 2010

Harvesting Rainwater

We get a lot of rain in Costa Rica. At the closest weather station (in Barva, about two and a half miles away) the average annual rainfall is 95 inches. That's almost double what we got back in Clemson, South Carolina. Ironically, even with all this rain, there frequently are water shortages. This is because: (1) the public water infrastructure is so poor (there is a lot of leakage, and they always seem to be repairing the pipes), and (2)  the Pacific side of Costa Rica has a fairly severe annual dry season, that lasts about 5 months.

I became interested in harvesting rainwater when I lived in South Carolina. This was due to the high cost of water, and because I am always interested in learning about new ways to conserve natural resources, whether it be energy, food, or water. I did a little research on rainwater harvesting and discovered that if it was for the purpose of household use, including drinking water (what is called "potable" water), it was fairly complex. But if it was for something like watering a garden, it could be fairly simple. As an experiment, I rigged up a downspout to pipe water from one of our roof gutters into our fish pond. When we got rain it helped refresh the water in the pond, and to keep it full without having to add city water. That's as far as I got.

When we moved here I decided to take it a step further. I wanted to pipe water into our water garden and for watering our plants. Water is inexpensive here, but just the same, it seemed a shame to let all of the rainwater runoff down the hill, when I could put it to good use in the garden. In addition, we have a large cement driveway which collects a lot of rainwater, which has the potential to run down into our neighbors property and cause problems. So, when I decided to build the pond, I figured it would be a good idea to build a water harvesting system first.

I hired a local builder, Alexis Sanches, to build the system. He is an experienced builder and has some experience with building ponds. He and I went to a water tank place out on the autopista between San Jose and Limon. I knew from the start that I wanted a fairly big tank. We settled on a big blue plastic one that held 4,200-liters (1,100-gallons). It came out cheaper per gallon than the the smaller tanks, and the larger tanks would be perhaps too much of a chore to bury. Eleven hundred gallons is a lot of water. Our 4-person hot tub back in Clemson held 316 gallons. So this was about four times as big. The tank dwarfed the pickup truck that we hauled it in. Just before we got to the tank place we noticed a police checkpoint on the highway, so to avoid any difficulty once we had the tank on the back of the pickup, we got off on a side-road and took the back way home.

The tank arrives

The tank created quite a sensation when it arrived. The neighbors wanted to know first, why I was buying a water tank when the city already provided water, and second, why I was buying such a big tank. They thought it would take forever to fill. I told them it was actually quite small for what I planned to use it for, and that with the roof, the driveway, and the average rainfall we had, I could potentially collect 150,000 gallons a year. Now, that's a LOT of water. I don't think they, or don Alexis, believed me.

Digging the tank and drainpipe hole

Alexis and I discussed the options of having a backhoe dig the hole, or having Alexis and a couple of helpers dig it. Alexis convinced me that digging the hole by hand would be cheaper and would cause less damage to the property than a backhoe, even though it would take a little longer. So, they started digging, and two and a half days later they finished the hole. Alexis put sand in the bottom to prevent a puncture from any sharp rocks. On the third day I was taking a nap when I was awakened by a loud WUUUUMP. They had dropped the tank into the hole. Don Alexis hooked up a drain system from the driveway and the small roof over our carport. He then put an electric submersible pump in the bottom of the tank. When he left that Saturday afternoon he predicted it would take several weeks to fill. "Not that long," I said. He smiled.


We got some heavy rain over the weekend. When he returned on Monday morning I said, "Alexis, why don't you check the water level in the tank." He looked at me kind of funny and then walked over to the tank and lifted the lid. He almost fell over backwards in shock. It was already full to the top, all 1,100 gallons of it.

So, now we have the storage tank and a collection system in place. This is just the beginning of the process. I'll report back later on how the project is going.

Happy gardening!

Thursday, November 11, 2010

The Bird Feeder, Part 2

We've been trying out some new items on the bird feeder. About a week ago Maria put out a half avocado that was past its prime. Surprisingly, the birds gobbled it up. Then, this week we put out a bunch of small bananas the Ticos call guineas. They are small, plump, and very sweet. The Ticos told us that birds loved to eat guineas. They were right. The feeder has been covered with birds for two days now. This morning we hit the jackpot. I was brushing my teeth when Maria began to shout excitedly. I came running out of the bathroom foaming at the mouth.


"What is it?" I gargled.

"It's a . . . it's a TOUCAN," she shouted.

We had not seen a toucan since we moved here. It was gone by the time I got out on the porch, so I'll have to take her word for it. One of the locals told us that it was true, on rare occasions toucans do come around this area. Later she looked it up in our bird book and identified it as a chestnut-mandibled toucan, the largest toucan in Costa Rica.

Happy gardening!

Monday, November 8, 2010

El Semillero

El Semillero is a seed and garden supply store located in downtown San Jose. I used to go there 40 years ago when I was a Peace Corps volunteer. I had forgotten about it until Fred Morgan, founder of the crgardening group ( http://groups.yahoo.com/group/crgardening/ ) recommended that I try it out (see info in blog for Nov. 6).


El Semillero is located on Calle 6, between Avenidas 2 & 4. Calle 6 is one-way heading south. About a block and a half south (on the right) is a pay parking lot. Their telephone is 2221-2983, and Web page --  http://www.elsemillerosa.com/ . It was founded in 1918 by Felipe Van der Laat. Supposedly you can order things through their web page, but it seemed pretty incomplete and out of date when I looked at it.

The staff was courteous and helpful. They sell all kinds of tools, fertilizers, and pesticides. They sell a few ornamental plants, and had flats of 2 kinds of lettuce and celery.

Most of the seeds I bought were sold to in quarter-ounce, sealed plastic bags, poured from tin cans. Almost all of them were treated with that electric pink fungicide. Most of the seeds came from Bonanza Seeds International, out of Yuba City, California ( web page: http://www.bonanzaseeds.com/ ).

I thought the prices were very reasonable, mostly in the 250 - 750 colon range, per quarter ounce. My local nursery charges 1,000 colones per quarter-ounce packet. I bought 15 packets and saved at least 7,500 colones.


For most vegetable varieties, they had only one type of seed. Still, the best selection I have seen in Costa Rica. Three things I wanted they didn't have -- peanuts, potatoes, and peas. The guy said they never carried any of these, and for potatoes, "Go to Cartago."

They seem to do a high volume of sales, meaning quick turnover of seeds, which is what we want for such a perishable product, in the tropics.

Happy gardening!

Saturday, November 6, 2010

Vegetable Seeds -- KAPUT

I have learned yet another valuable lesson -- take good care of your seeds. Back in South Carolina I had a system going. In late February-early March I bought my seeds at the local feed & seed, planted my garden, saved the remaining seeds for the fall garden, planted that in August, and then threw away the rest of the seeds. This was a yearly routine that worked like a charm. I always had good germination. Here in Costa Rica I've learned that seeds purchased might not be viable to begin with, and, especially during the rainy season (May - November), they will probably be viable for a couple of months, if that. While I prepared my garden, I bought seeds compulsively at nurseries and ag coops, plus my friend Louis had brought me some from the States in May, and I had also harvested sunflower seeds here. Well, I began planting in September, in flats, and directly in the garden. Everything -- seeds from the States, seeds bought locally, seeds I had harvested -- were kaput . . . finito.

I wanted to have the garden well underway by December, when the dry season started, so, in desperation, I began looking for flats. The answer was always -- we don't carry flats -- or -- we can get them, but you have to purchase a minimum of 200 plants. What? Finally my local nursery checked and got some small flats of sweet peppers and lettuce. Well, that was a start.

So now I'd come full circle -- I needed seeds, since I couldn't get flats. I posted a message on crgardening < http://groups.yahoo.com/group/crgardening/ > and fortunately Fred Morgan, the group's founder, recommended I try a store in San Jose, called El Semillero. Bingo! I remembered 40 years ago, when I was Peace Corps volunteer here, I made monthly trips to San Jose, and usually went to El Semillero, which everyone said was the best place to buy seeds. I went there within a few days of receiving the recommendation from Fred, and this will be the subject of the next blog post.

In the meantime, I went on the internet and researched seed storage. Basically, I found that seeds should be stored in airtight containers in either your refrigerator or freezer, with a small dose of powdered milk to absorb moisture. Silica gel, apparently, can actually absorb TOO MUCH moisture. So, I've thrown out my old seeds and the new ones (that I just purchased) were popped into the refrigerator in the recommended manner.

Happy gardening!

Monday, November 1, 2010

October Weather Report -- Dry(er)

October brought a welcome relief from the two-and-a-half months of torrential rains. On the second, we got a drenching of 3.6 inches. Winds had been blowing steadily from the west for months. The next day was calm and it rained less than half an inch. On the 4th the winds shifted around to the east, the sun came out, and the humidity dropped. Nine rainless days followed. It rained a couple of times a week for the remainder of the month, bringing the total to 10.1 inches.

Agapanthus orientalis
The plants have recovered nicely from waterlogged conditions, and the agapanthus lining our driveway have put on a spectacular show.

October is usually the rainiest month of the year. What happened? According to a friend, the change is due to the Madden-Julian oscilation (MJO), an eastward-traveling tropical weather pattern causing rain anomalies, lasting 30-90 days, meaning we could be due for some more heavy rains in November or December. For more information on the MJO, go to http://en.wikipedia.org/wiki/Madden-Julian_oscillation.

On October 31 the winds shifted around to the west again, the humidity increased, and it began to rain.

Happy gardening!

Wednesday, October 27, 2010

The Vegetable Garden, Part 1

The vegetable garden has been a struggle -- eight inches of solid clay, covered by rampant African star grass, and rain averaging over 20 inches a month, oh my! And we are bracing for the invasion of the gophers (it is only a matter of time before they discover the veggies) and winds in December and January are expected to be in excess of 70 mph, oh my, oh my, oh myyyy!!!

The vegetable garden has been on my mind since we arrived in July of 2009. It was, of course, just a concept at the time, and even though I couldn't wait to get started, it had to remain a concept for quite some time. First, we had to finish the construction of the house, then we had to deal with soil erosion, establish a lawn, landscape the entrance, build a sidewalk, and begin planting trees and shrubs. The vegetable garden always seemed to take last place.

It finally got underway in February 2010 when I marked off a 30 X 25-foot section of ground, and covered it with two layers of black plastic, weighted down with stones. I waited patiently for three months, and in May pulled back the plastic. Voila, the star grass was gone. My gardener and I spent two hours digging it up to remove any remaining star grass roots. The soil was hard, red clay. I trenched it to about a foot deep, buried fresh compost, and waited another month. During the trenching process I came across the original topsoil, about 8 inches down. What a pity! I then covered another section of grass and clay with black plastic, so the garden would eventually be 60 X 25 feet in size.

Red clay is about 8 inches deep.
In June I planted a row of sunflowers. I knew they would do well, even in the clay, and hopefully their roots would get down as far as the compost and old topsoil. Also, when they finished blooming I could dig them under to help build up the soil.

In July a started forming the first rows for planting, digging in compost, sand, rice hulls, topsoil, and lime. I didn't add nearly enough soil amendments, but I was anxious to get started. I only spaded up about the top four inches of soil (back in South Carolina I always went down at least a foot). I planted radishes, cilantro, corn, okra, beets, lettuce, cucumbers, tomatoes, and peanuts. This was all experimental, of course, and my expectations were low. I wanted to see how different crops dealt with the soil and climate.


Garden at an early stage. Sunflowers on the right, corn on the left. Arbor in the background was for chayote, which got torn up by 70+ mph winds in December and January.
In August I pulled back the covering of plastic over the new section, only to discover that the plastic had not killed the star grass nearly as well as the first time.

Black plastic covering the new section.

Back in the original section, the sunflowers did extremely well. The peanuts did surprisingly well too, given the conditions. The corn started out well, but the stalks began to die one by one. I discovered they had a bad infestation of grubs. The okra and tomatoes fizzled. Being charitable, I'd say the other things did so-so.

Heavy rains began in mid-July and the garden became a swamp, even though it was on a slight slope. I dug a ditch around the edge and began creating raised beds. My first set of raised beds is complete and I have added a lot more soil amendments. My second round of plantings are doing much better than the first. These include corn, cilantro, lettuce, sweet peppers, okra, sweet potatoes, and mustard greens. I treated the corn for grubs and stalk borers, which seem to be a big problem here. We just harvested our first crop of mustard greens and they did just as well as in South Carolina. The second corn planting looks good and is tasseling.

Two weeks ago the gardener and his helper dug up the new section. I knew the top six-to-eight inches was solid clay, so I had them remove it. My helpers were a little dubious at first, but pretty soon they came to the dark topsoil underneath and began to get excited. Last week I finished the first of four raised beds in the new section and planted it in peanuts and radishes. The second raised bed is now complete and ready for planting. I have been looking for seed potatoes and flats of onions, but have yet to be able to locate any.

Raised beds -- mustard, sweet potatoes, & cilantro on the left, corn in the middle, one hot pepper plant on the right.
The raised beds are approximately six inches high (just high enough so they will not flood) and about 30 inches wide. Due to the heavy rains here, I have used wooden boards along the sides of the beds to reduce soil erosion. The boards are held in place by rebar cut to lengths of 16 inches and driven straight into the ground. For the high winds, expected to arrive in December, I have put up a wind barrier on the east side made out of wooden posts with corrugated metal siding. All of these materials -- boards, posts, and rebar -- were  left over from the house construction.

Removing the red clay from the new section.
For the gophers, I have gopher traps ready for use. I have tried the traps once before, without success. Gophers are wily creatures. It's going to be warfare, I am sure.

The new section is ready for raised beds.
I also constructed a three-foot high wire fence around the entire garden, to keep the dogs out. So, the garden is now dog-proof, flood-proof, and wind-proof. The gophers, I think, will be the ultimate challenge.

First crop of mustard greens (with some ñame in the foreground).
Happy gardening!

Tuesday, October 19, 2010

The Sun Comes Up Behind Irazu

Turrialba on left (with plume); Irazu on right, moments before sunrise.

Irazú Volcano looms on the horizon fifteen miles east of us. Next to it, and set seven miles farther back, is Turrialba Volcano. At 11,000 feet elevation, Irazú is one of the biggest landmarks in the country. When driving in the Meseta Central, if I am lost and I see Irazú ahead of me, at least I know I am headed east. I have used its location many a time to help me find my way around.

Day length varies dramatically with the seasons in the temperate zone; in the tropics it only varies by a few minutes. This is something I knew when I moved here. I also thought another difference was that, whereas the track of the sun across the sky changed dramatically in the temperate zone, in the tropics it stayed virtually the same. Boy was I wrong. When we arrived, the sun was rising just to the north of Turrialba. Soon we noticed it rising just to the south of it, then behind Irazú, finally to the south of Irazú.

This change of the sun track affects gardening, as we quickly learned. We planted some shade-loving plants in the shade of our avocado tree. But as the sun moved, we found them in the sun. Oops! The position of the sun can be an important detail when gardening in the tropics.

So, actually, the sun doesn't always come up behind Irazú --only in November, December and January.

Happy gardening!

Saturday, October 9, 2010

Peanuts

Peanut plants just prior to harvest
After 41 years I have been happily reacquainted with peanuts, growing them, that is. My first gardening experience was in the school garden in La Cuesta, a village in southern Costa Rica. Somehow I got a hold of some peanut seeds, we planted them, and as I recall, they came out pretty well. I'm not sure why I never grew them again, until now.

This last May my best friend, Louis, brought me various packets of vegetable seeds he had purchased at Griff's Feed & Seed in Pendleton, South Carolina. Among them were some Valencia peanuts. I was dubious about the peanuts, and I told Louis: (1) I didn't think it was warm enough at our elevation for peanuts, (2) peanuts needed a sandy soil, and my soil had way too much clay in it, and (3) if I planted them then, they would mature during the peak of the rainy season, which might cause the peanuts to either rot or to sprout before I could harvest them. Louis was persistent in his encouragement for me to plant them, and I knew that every time he Skyped me on the internet he would ask me about them. So, more to shut him up than for any other reason, I planted about 10 seeds in my fledgling vegetable garden.


Peanut harvest

I got 100% germination, and, to my surprise, the plants looked fairly good, but seemed to be struggling somewhat in the clay soil. Then I started my raised beds with improved soil. The peanuts were now about two months old, and were in the way of my future raised-bed garden. So I dug them up and moved them to the raised beds. They went into shock, but the heavy rains kept them alive, and with the new soil, they seemed to actually improve. Late in the season it rained for 40 days and 40 nights, or thereabouts, and I was worried about the peanuts rotting in the soil, and then suddenly, at 123 days the rains stopped. Valencia peanuts are not supposed to be harvested for 140 days, but the dry spell continued and I knew this would probably be my only opportunity to harvest them. I pulled up one plant, and checked the peanuts. They seemed to be in good shape, and the seeds were nice and plump. So, I pulled up the remaining few plants and am now drying them. I plan to roast them next week. Valencias are used more for boiling than roasting, but I prefer roasted peanuts, so that's what I plan to do with them. I have been keeping Louis appraised of the progress, and he seems to be delighted. Next year I'll ask him to bring a roasting variety.

Happy gardening!

Friday, October 1, 2010

September Weather Report -- Distastrous Rains

Rains continued apace in September. Low pressure zones (including Hurricane Matthew) crossing the Caribbean from east to west pulled moist air in off the Pacific Ocean, dumping tons of rain across Central America and Mexico. Rivers flooded, bridges washed out, and roads collapsed. The road next to our favorite watering hole in Concepción (Bar La Guaria) collapsed on the last day of the month, closing the bar (temporarily, we hope) and very nearly swallowing it up.

Enormous hole next to Bar La Guaria
Very little gardening took place at our home due to the soggy conditions. It was even a challenge to find a couple of hours of sun in order to cut the grass. Trees and shrubs are doing as well as expected, given the conditions. If it weren't for the drainage ditches dug at the beginning of August, many things would not have survived. Corn, radishes, peppers, and mustard are doing well in the raised beds in the vegetable garden. Almost all of the vegetable seeds planted in flats failed to germinate. Tomato plants are not looking good.

Total rainfall was 26.7 inches, half an inch less than August. Cumulative rainfall since we began measuring it in mid-June comes to 70 inches! The highest daily total for the month was 4.7 inches on Sept. 28. There was measurable rainfall on 28 of the 30 days.The first half of the month was quite nice, with generally sunny mornings and rain in the afternoon or evening. The sun was rarely seen during the second half of the month.

Normal rainfall in our area is 10.5 inches in August and 16.5 in September, so you can see, we are way above the average. Last year we had an El Niño, which brought warmer, drier weather. This year we are having a La Niña, which makes for cooler, wetter weather.  As for the future, October is generally the rainiest month of the year.

Stay tuned, and . . . happy gardening!

Wednesday, September 29, 2010

Clay

It's been said that soil is the foundation of civilization. If society does not take care of its soil, it will eventually fail. This may or may not be an exaggeration, but it is definitely no exaggeration that soil is the foundation of any garden.

Clay, or better put, too much clay, can, at worst, be the downfall of your garden, or at best, make gardening much more difficult and challenging.

I have had some experience with clay. I gardened for 29 years in Clemson, South Carolina, an area made famous by a book written in 1942 by Ben Robertson. The title of Robertson’s book is Red Hills and Cotton. By the phrase, red hills, Robertson was referring to, red clay. When the first European settlers began farming the northwestern corner of South Carolina in the latter half of 18th century, it was covered by a foot or more of rich, dark brown humus, which had been building up on the forest floor for thousands of years. For farming, it was like having money in the bank. But good soil, like a bank account, is something you must take care of, or you will eventually go broke.

Underneath the topsoil was hard, red clay. Unfortunately, due to the combination of hilly terrain and poor tilling practices, the topsoil slowly eroded away. By the 20th century the topsoil was gone, but the farmers continued to try to eke out an existence, in a place that now resembled more of a moonscape than a landscape. The arrival of the Great Depression in 1929, and the collapse of the demand for their crops (mostly cotton), was the last straw. Many farmers were wiped out, losing their farms to the banks, or selling them off for as little as a dollar an acre. These farmers were cursed by their forefathers, who, instead of improving the soil for a better tomorrow, farmed for short-term productivity, allowing the soil to slowly erode away.

Surprisingly, clay soils in general tend to be fairly high in plant nutrients. The problem is the structure and texture of the soil. Clay particles are extremely fine and flat. They fit tightly together, making it difficult, if not impossible, for plant roots to penetrate, and even if the roots do manage to grow, it allows little or no air to reach them. Plants breathe through their roots, and if they cannot do this, they die. When it rains, water fills what little air pockets there are in the clay, and the roots cannot breathe. During a dry spell, clayey soils maintain moisture longer than sandy soils, but when they do eventually dry out, they become as hard as rocks.

Sandy soils, on the other hand, are made up of larger particles, with a loose structure, and are easily penetrated by plant roots. In counterbalance, sandy soils tend to be lower in plant nutrients than clayey soils; they also dry out faster. What you want in your soil is a nice balance between clay and sand, and most importantly, you want lots of organic matter.

Quoting from Home Vegetable Gardening, a publication of the Clemson University Extension Service, “Oftentimes gardeners get caught up in the beauty and bounty of the vegetables without remembering that the foundation for any healthy garden is soil. A good soil allows air, water and nutrients to be absorbed by plants’ root and lets those roots roam freely. How do you build healthy soil? Add organic matter.” Organic matter improves drainage in heavy clay soils. It holds the clay particles apart, improving air and water movement in the soil.

My garden in Clemson was located in an area that had once been a flood plain next to a creek. When our house was built in the 1960s, the builder covered the rich soil of the flood plain with a heavy clay loam. When I began gardening I added huge quantities of organic matter to it in the form of tree leaves, horse manure, and wood ashes. Within a couple of years I had a soft, rich loam. Plants thrived in it. I continued adding organic matter, and the garden just kept getting better and better.

When we purchased our lot in Costa Rica in 2006 it was covered with a silty, dark (almost black) volcanic soil. Unfortunately, this rich topsoil was only a foot or so thick. Underneath was hard red clay. During the excavation process for our house a lot of subsoil was dug up, and, unfortunately, bulldozed over the top of the topsoil. A couple of inches wouldn’t have been too bad, but the average depth of the clay is eight inches. If I were to start a brick factory, I would have been in business. As far as gardening, it was a catastrophe.

It was in April of 2009 that I got my first inkling of how bad the situation was. It was near the end of the dry season and I was going to dig up an area in preparation for planting some grass. I tried to drive a shovel into the soil. It was solid clay, and the shovel just bounced off. It didn’t matter how hard I banged on it with the shovel. It wouldn’t budge. The next day it rained. I tried with the shovel again, and this time the shovel went in, but it was almost impossible to get it back out -- it was a sticky mess. It was so sticky, in fact, I could not shake the clay off of the shovel, and had to use a knife to scrape it off. Breaking up sod is a hard enough job as it is, but breaking up heavy clay is next to impossible.

Clay on left; loam on right


So, how does one tell if they have a heavy clay soil? Many clays are red; so a red color can be a good indication. But there are also yellow, gray, and even white clays. Take a fistful of soil in your hand and squeeze it as hard as you can. When you open your fist, if the soil maintains its shape exactly, you have a clay soil. If you then take it between your fingers and roll it, like you would with modeling clay, and it comes out ropey, you have a heavy clay soil.

Both clay (on left) and loam (on right) have been squeezed. The clay maintained its shape.

WHAT TO DO?
Okay. So, we know clay is a blessing for brick-makers, and catastrophe for gardeners. The question now is: What to do?

Plan A was to attack it piecemeal, and see what would happen. I bought two dump-truck-loads of topsoil, a couple of cubic meters of sand, and several bags of lime, and I began composting organic matter like mad. For my shrubs and trees, I dug large holes and filled them with my new homemade potting soil mix. It was the dry season, so I watered everything about twice a week. Things looked pretty good. When the rains began in mid-April (almost a month ahead of schedule) the plants really began to look quite good. Then on July 20th we got a four-inch rainfall in about three hours. Heavy rains continued several times a week after that. Soon I began to notice the plants were stressed. Leaves turned yellow and began to fall off and some of them began to wilt. What I had done was to make rainwater collection basins. The rain hit the clay soil, which it could not penetrate, so it ran downhill until it found the holes of good soil, where it collected, and rotted the roots of my plants.

About two weeks later I called my gardener in a panic and he and his helper came over and the three of us dug drainage ditches around everything. The plants began to recover, but then in August and September we averaged not quite an inch of rain a day. We shall see if anything prospers, or even survives.

Plan B is to scrape off the top of the soil with a backhoe, exposing the rich, organic soil underneath. But we will have to wait until the dry season for this, due to the difficult texture of the soil and the potential erosion and flooding that could result. And what will we do with all of that clay?

Today's blog has been a rant about clay. I apologize, but I had to get it off my chest, at least, for a while.

Happy gardening!

Monday, September 27, 2010

Angel's Hair Mimosa

Here is another very neat plant for your garden -- Calliandra calothyrsus, commmonly known as angel's hair mimosa (pelo (or, cabello) de angel). It captured my imagination the very first time I saw it. I don't remember where it was, but I was in a garden at an ecoloodge somewhere in Costa Rica. It was early morning and I was out looking for birds. A shaft of sunlight shown down through the shadows onto some dewy blossoms. The bright red staminal filaments glistened spectacularly, like one of those fiber optics lamps. At breakfast I told the rest of our group about the dazzling flowers I had seen. "come on, come on," I said. "You simply have to come and see this amazing tree . . . the flowers are absolutely psychedelic." But by then the garden was flooded with light and the blossoms, though still very pretty, could not compare with what I had seen an hour earlier. It was impossible to capture the moment.

Fiber optic light (see any resemblance?)

One morning, not long after moving to our new home in Concepción de San Rafael de heredia, my wife, Maria, and I were out walking on Ciénega Road, which follows an intermittent mountain stream. We noticed several angel's hair mimosa growing wild near the stream, and it just happened to be the right time of year for them to bloom (late in the rainy season). Maria pulled up several young saplings and brought them home. The tree seemed to like moist soil and partial shade. We looked around our property and found the right spot. She planted several of them, and one survived (I accidentally cut down some of them, not recognizing them among the weeds). A year later it is over ten feet tall and has set out a large array of blooms. When the buds first appeared the grayish saltators (a type of bird) began eating them (the locals call them "point eaters (come puntas). But the birds eventually moved on to other types of buds to eat.

Angel's hair mimosa is native to Central America and Mexico. I bears beautiful feathery leaves on thornless branches. The leaves fold up in the evening. It grows rapidly and can reach 12 meters in height. It can get a little straggly and weedy looking -- we might try pruning it in the future to give it some kind of shape. It can tolerate a wide range of soils, but does not tolerate poor drainage, and grows in either light shade or full sun. It can be grown from sea level to over 5,000 feet, but seems to do best at the higher elevations.

The Calliandra mimosa genus has about 200 species and it is in the fabaceae (legume) family. These trees take nitrogen from the air and with the help of bacteria growing in their roots, fix nitrogen into the soil -- a good tree to have around. It is occasionally grown as a shade tree in coffee plantations and in hedgerows.

Angel's hair can be started either from seeds or seedlings. The seeds should be soaked in cold water for 48 hours (some say soaking it in very hot water for several hours works too). Many Costa Rican gift shops carry small packets of the seeds, distributed by El Arca Verde de la Plantas, S.A. I went ot the web site printed on the package, but was unable to pull up any information about the company.

Happy gardening!

Wednesday, September 22, 2010

Fuchsia Triphylla

When we first moved here we noticed that our neighbor, Victor,  had a type of fuchsia growing in his yard that always seemed to have hummingbirds hovering around it. We looked for it in local nurseries, without any luck. So, my wife Maria pulled some rhizomes off one of Victor's plants, with his permission, of course. It has been doing very well, and is visited regularly by hummers. The more I get to know this plant, the more I like it. It is very healthy and has bloomed continuously for a solid year now. It seems to have no pests and requires almost no upkeep, other than weeding around it every couple of months, and maybe watering it every two weeks or so in the dry season. Besides the beautiful crimson flowers, the velvety foliage is attractive, and the plant has required no pruning or staking.

Fuchsia triphylla

But what got me absolutely raving about this seemingly perfect plant was an incident that happened this morning. The fuchsia is located near our backdoor, and happens to be the first plant our golden retriever encounters when he goes outside. As a result, it gets peed on several times a day. Maria and I agreed that I had better put a fence around the fuchsia before it got burned by the nitrogen from the dog urine. I decided to do a good weeding before I put up the fence. The soil, I discovered, was almost solid clay, and the plant was growing on top of a 40-pound chunk of cement. Wow -- what a plant!!! I removed the cement and some of the clay and gave it some nice potting soil.

I didn't know what kind of fuchsia it was, so spent quite a bit of time searching the fuchsia images in Google. At first I thought it might be a Fuchsia boliviana, but eventually found some photographs that matched what we had -- Fuchsia triphylla. It is native to the islands of the Caribbean and is now grown throughout the neotropics. It likes full sun, but also does well in partial shade, and it likes high temperatures of around 80 and lows around 60, which matches the average temperatures we have here to within a few degrees. It only grows about 2-3 feet tall, whereas the Bolivian version can grow to 5-6 feet. We have a seedling of a Fuchsia boliviana that we got from the Trogon Lodge in San Gerardo de Dota, again, with permission (see photo below).

Fuchsia boliviana seedling
 The flowers of the boliviana are at least twice as long as the triphylla. One important difference, we noticed the hummers were piercing the sides of the boliviana flowers, near the base, meaning they were probably NOT pollinating the flowers, whereas the hummers visiting the triphylla flowers were sticking their beaks up through the center of the corolla, meaning they were probably pollinating the flowers.

Fuchsia triphylla flowers

Oops! I just noticed in the close-up photo above of our triphylla blossoms that there is a telltale scar at the base of one of the flowers . . . maybe a hummer hole. I'll have to pay closer attention.

Happy gardening!

Friday, September 17, 2010

One Year - an Assessment

We've been gardening in Costa Rica for a year now. There have been many successes and failures. It is time to tally the results.

Background
When we bought the property in 2006 it was covered with a dark volcanic soil. The northeast quadrant was especially good. The owner was growing corn and squash at the time. In 2007/08 it lay fallow, and became overrun with African star grass, an invasive, exotic species. During construction in 2008/09 the builder ended up with a huge pile of red clay, which he (in our absence and without our knowledge) bulldozed over the top of the volcanic soil, to an average depth of about eight inches. When we arrived in 2009 about three quarters of the lot had been basically destroyed by the red clay. The northeast quadrant was still rich, black volcanic soil, but in several places had been compacted by heavy equipment and mixed with building debris -- sand, gravel, chunks of cement, broken glass and ceramic tile, rusty nails and wire, pieces of wood, plastic, Styrofoam, etc. The red clay was also filled with debris.

We began digging up the northeast quadrant and removing the debris. After two months we had restored, and actually improved the soil -- sand had been added to the silky smooth volcanic soil, giving it excellent drainage. We are gardening this area intensively.

In the red clay area we had two dump-truck-loads of black soil delivered. We mixed this with sand, lime, rice hulls, and compost, and began digging large holes for planting trees and shrubs. Things went well until July 20, when we received 3.7 inches of rain in about three hours. Most things in the red clay area went downhill from there. What happened was this, the rain could not penetrate the red clay, so the water ran downhill until it found the shrub/tree plantings (with the good soil), where, having no place else to go, it soaked in and sat there, damaging the roots. We have added drainage ditches since then, and most of the plants are hanging on, and some seem to be actually recovering.

Other major problems encountered were: grubs, stalk borers, gophers, leaf-cutter ants, and high winds (in December and January).

We are also working on a vegetable garden featuring a windbreak and raised beds with wooden siding.

There have been many failures and some complete catastrophes. Most of the failures are in the red clay area. Most of the successes are in the black soil area. Originally I called our gardening a "work in progress." Since July 20 I refer to everything as "an experiment." We have learned many lessons, which we are now applying to create our future garden in paradise.

THE BIGGEST SUCCESSES (Top 20, ranked)
  1. Impatiens -- planted five New Guinean impatiens near the front door in black soil, each a different color, They are the first thing guests comment on. The white one is two and a half feet tall!
  2. Angel's hair mimosa -- (Calliandra calothyrsus) -- my wife, Maria, dug up some very small saplings along the side of the road. One survived and is now eight feet tall and covered with flowers (planted in rich, black soil, in a shady area).
  3. Sunflowers -- now on our third planting of medium-sized, multicolored sunflowers. They can grow in almost any soil; just give them lots of sun; hummingbirds and honeybees love them.
  4. Targuá (Croton draco) -- a native, fast-growing pioneer species; planted a foot-tall sapling, dug up from the side of the road; now seven feet tall and blooming.
  5. Wandering Jew (Tradescantia zebrina; Cucaracha) -- two varieties acquired from coffee plantation next door. Doing very well in shady area; they make a nice, lush ground cover.
  6. Poró (Erythrina lanceolata, coral tree) -- full-size tree that came with the property, growing on north property line; sheds its leaves and blooms from November till march; Baltimore orioles love it.
  7. Jacaranda (Jacaranda mimosifolia, Nazareno) -- brought to us by our gardener; doing very well in less than average soil.
  8. Avocado tree near driveway -- native (criollo) species that came with the property; all of the cement mixing took place around it, and it made it through like a trooper; loaded with fruit, May - July.
  9. Purple taro (black magic) -- planted in good soil; prolific.
  10. Grapefruit -- pink variety; planted on steep slope, in average soil; doing very well.
  11. Tree tomato (Solanum Betaceum, tomate de palo) -- my wife dug it up in a nearby coffee plantation; huge leaves; already bearing fruit (fruit, leaves, and branches resemble an egg plant more than they do a tomato).
  12. Fuchsia (Fuchsia triphylla) -- my wife pulled up a seedling along the side of the road; hummingbirds love it.
  13. Caladiums -- green with cream-colored freckles; given to me by a sister-in-law; planted in rich black soil in partial shade; prolific.
  14. Güitite (Acnitus arborescens, wild tree tobacco) -- native species; produces fruit for the birds; planted in 2008; doing very well; many volunteers popping up around the property.
  15. Coleus -- many varieties planted from cuttings in shady areas; tolerates many types of soils.
  16. Porterweed (Stachytarpheta frantzii, rabo de gato) -- purple ones doing very well (pink ones doing okay); hummingbirds love them.
  17. Agapanthus -- planted in the dry season (when they normally bloom); they began blooming almost immediately.
  18. Banana -- several on the property planted in clay are doing poorly; one planted in black soil doing very well.
  19. Jalapeño peppers -- bought a small flat at EPA (Costa Rica's equivalent to Lowe's), not knowing what variety of pepper they were; prolific.
  20. Brazilian red cloak (pavoncillo rojo) - planted four-inch high seedling; now five feet tall and growing vigorously.
Passiflora (before the gopher got it)

THE WORST FAILURES (Bottom 10, ranked)
  1.  Passion flower (passiflora vitifolia) -- did terrific until gopher ate the entire root system; planted a second one with an underground wire cage to protect it from the gophers.
  2. Chayote -- planted in unprotected area with less than ideal soil; 70+ mph winds in January tore it up.
  3. Impatiens -- my wife pulled up several plants from a nearby coffee plantation (where they were growing wild); by accident they were planted in organic fertilizer from a nearby coffee processing plant; we think the fertilizer was very acid; they died.
  4. Vinca -- same thing happened to them as the impatiens.
  5. Celery -- planted them twice in different locations, and their leaves seem to just burn up.
  6. Eucharist lily (Eucharis grandiflora) -- tried planting them in various habitars, with no luck.
  7. Corn -- wiped out by grubs.
  8. Bamboo -- planted a bamboo fence in the dry season; not weeded or watered because we thought the bamboo could fend for itself; we were wrong.
  9. Mango -- we purchased a variety that does well at high elevations; it did well for a while, but was attacked by fungus; now spraying with copper sulfate.
  10. Bougainvillea (veranera) -- did okay in the dry season, but when the heavy rains came they began to look poorly and shed their leaves.
Happy gardening!

Sunday, September 12, 2010

The Bird Feeder, Part 1

One of the neatest things we did during our first year in Costa Rica was to put up a bird feeder. It is a chore to stock it each day, bit it provides us with endless hours of entertainment. In South Carolina we had three types of feeders: seed, suet, and nectar. On our trips to Costa Rica, however, we never saw a seed feeder, but saw lots of fruit feeders. We tried putting up a fruit feeder back home, but succeeded only in attracting butterflies and wasps. As for seed feeders at our new location in Costa Rica, we knew it would probably attract rufous-collared sparrows, and maybe some pigeons and doves; we have put this project on hold.

Family of mot mots having dinner
Soon after our arrival we explained to our handyman, Don Oscar, that we wanted a platform-type fruit feeder that would allow the small bits of fruit to fall through the bottom, and would not collect rainwater. After a little thought, he designed a feeder with a square, wooden frame, with one wooden slate across the middle for support. The top is covered with one-inch size metal screen. It measures about 15 inches on a side, and is mounted on a 2-inch square iron pipe, which sits on a cement base. The platform sits about five feet off the ground. Later we added some metal pegs on which to stick the fruit, so that the birds would not accidentally knock it off the platform.

In South Carolina we had had problems with squirrels, and built or purchased various devices to keep them away. We have squirrels here too, but so far they have been almost no problem. We did see an opossum on the feeder one evening, something we never saw back home.

We stock the feeder regularly with plantains (the birds don't like them too ripe) and sometimes with papayas. We have tried bananas, oranges, lemons, mangoes, and pineapples, but the birds seem to prefer a diet of plantains and papayas. Our neighbor puts up watermelon, and says the birds love it.

We have been surprised by the different types of birds that come to the feeder. Would you believe, woodpeckers eat fruit? The birds that come on a regular basis include; clay-colored robins, grayish saltators, black-headed saltators, great kiskadees, blue-gray tanagers, Hoffmann's woodpeckers, and blue-crowned mot mots. Occasionally we have flame-colored tanagers, Baltimore orioles, and melodious blackbirds.

Opossum raiding the feeder
If we let them, the birds could eat us out of house and home. After much debate, we decided to limit our hospitality to two plantains and a quarter papaya per day. The robins are the most regular, and voracious, eaters, followed by the mot mots. Frequently after sunset, if we peer out our window, in the dim light we can make out a mot mot getting his last bedtime snack.

Happy gardening!